The UAM (User Account Management) Main View is the central area for managing user accounts within the system. It provides administrators with a structured interface to view, add, edit, and disable accounts, ensuring that user access and permissions remain accurate and secure.
User Access Management Main View
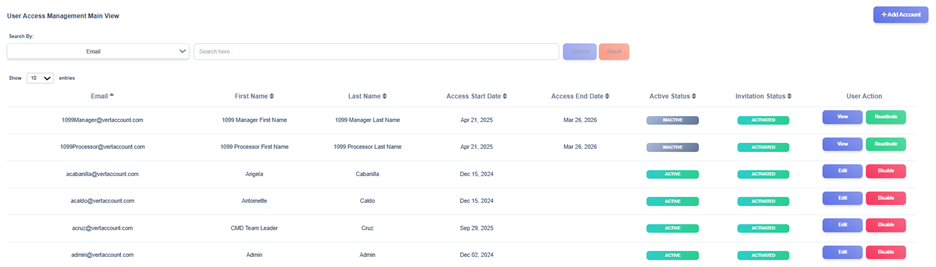
The UAM Main View provides users with an organized view of user accounts stored in the system. Each record displays important details such as the user’s first name, last name, email address, access start date, access end date, active status, invitation status, and available user actions. This module serves as the central point for managing user access and ensuring account information remains accurate and secure.
At the top of the view, a search function allows filtering by email, first name, or last name. This makes it easy to locate specific accounts without scrolling through the entire list.
On the right-hand side, the Add Account button enables administrators to create new user accounts.
For each account record, three key action buttons are available:
- Edit – Allows modification of account information.
- Disable – Marks the account as inactive, removing access while retaining the record for audit purposes.
- Reactivate – Re-enables a previously deactivated account, restoring it to active status and retaining all of its access.
- View – Displays an inactive record in read-only mode, ensuring historical information remains accessible for audit or reference purposes.
Adding a New Account
1. Open the Add Account Form
- From the UAM Main View, click + Add Account (top right).
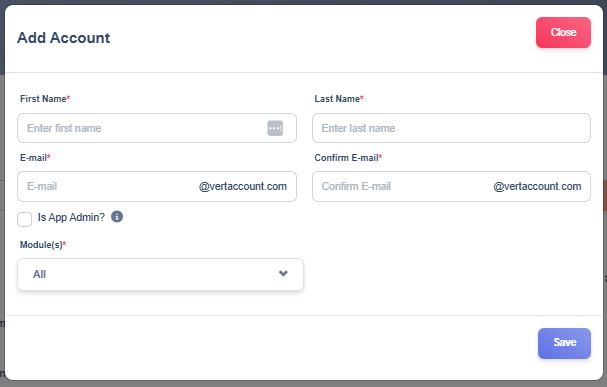
2. Complete Basic User Information
Fill in the required fields:
- First Name* – Enter the user’s given name.
- Last Name* – Enter the user’s surname.
- E-mail* – Enter the user’s email address. The domain @vertaccount.com is automatically appended.
- Confirm E-mail* – Re-enter the email address to confirm accuracy.
3. Assign Administrative Privileges
- Check the Is App Admin? box if the user should have administrative rights.
- Selecting this will make the user a Super Admin with full system access and no restrictions. Modules and roles will be disabled while this is checked.
4. Select Module Access
- Use the Module(s)* dropdown to assign system modules to the user.
- Available modules are Client Master Database, 1099 TIN Matching App and Employee Master Database.
5. Select Roles
- Use the Role(s)* dropdown to assign system user roles. Each modules have their own user roles.
- For Client Master Database module, roles available are CMD Associate Role, CMD Team Leader Role and CMD Manager Role.
- For 1099 TIN Matching App module, roles available are 1099 Processor Role and 1099 Manager Role.
- For Employee Master Database module, roles available are EMD Associate Role, EMD Team Leader Role and EMD Manager Role.
6. Save the New Account
- Click the Save button (bottom right) to submit the form.
- The system validates required fields; missing or incorrect entries will trigger inline error messages.
- Once saved successfully, the new account appears in the UAM Main View list, and an activation email is sent to the user.