The Contract Main View is the main area for managing contracts in the CMD module. It shows both active and disabled contracts and lets users search, add, review, update, or disable records, helping keep contract information organized and accurate.
Contract Main View
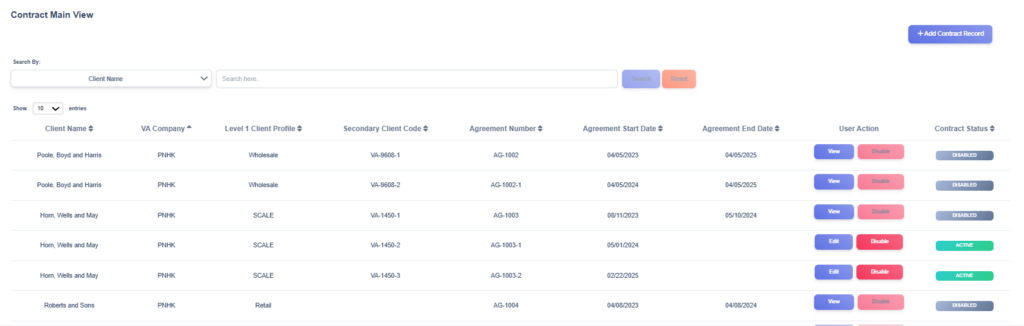
The Contract Main View provides users with an organized view of contract records stored in the CMD. Each record displays key details such as the Client Name, VA Company, Client Profile, Agreement Number, Agreement Start Date, Agreement End Date, and Current Status. This main view serves as the main point for managing contract information and keeping records accurate and easy to access.
At the top of this section is a search function, which allows users to filter records by criteria such as client name, VA company, level 1 client profile, secondary client code and agreement number. This makes it easy to quickly locate a specific contract or group of contracts without scrolling through the full list.
On the right-hand side, the Add Contract Record button enables users to create a new contract record and include all relevant details.
For each record in the list, users are given three key action buttons:
- The View button allows users to view existing client information.
- The Edit button allows modifications to existing contract information, such as updating details or correcting errors.
- The Disable button is used to mark a contract as disabled, which removes them from the active list but keeps the record in the system for tracking and reporting purposes.
New Contract Record
1. Open the New Client Contract form
- From the Contract Main View, click + Add Contract Record (top right).
2. Contract Identification
- Is this contract replacing an existing one?* — Select Yes or No.
- If Yes, use Select the previous agreement number to pick the contract being replaced.
- Client* — Select the client this contract belongs to from the dropdown.
- Level 1 Client Profile* — Select the client profile/category (e.g., Retail, SCALE, Wholesale).
- Secondary Client Code — (optional) enter a secondary/internal client code if applicable.
- Agreement Number* — Enter the unique agreement number for this contract (must be unique within CMD).
- Currency* — Select the currency used for revenue values.

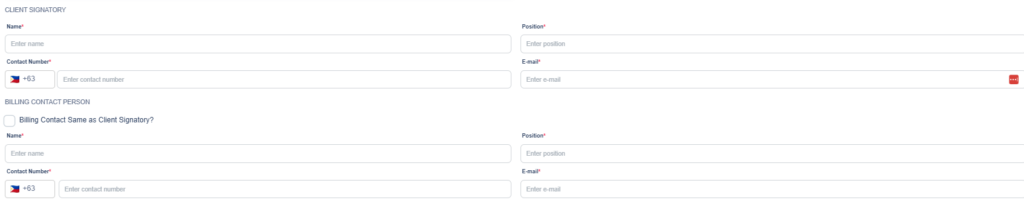
3. Client Signatory
- Fill the Client Signatory fields: Name*, Position*, Contact Number*, and E-mail*.
- These are the authorized people who sign the contract.
4. Billing Contact Person
- If billing contact is the same as the client signatory, tick Billing Contact Same as Client Signatory?
- If checked, the billing contact fields will auto-fill.
- If unchecked, enter billing contact Name, Position, Contact Number, and E-mail.
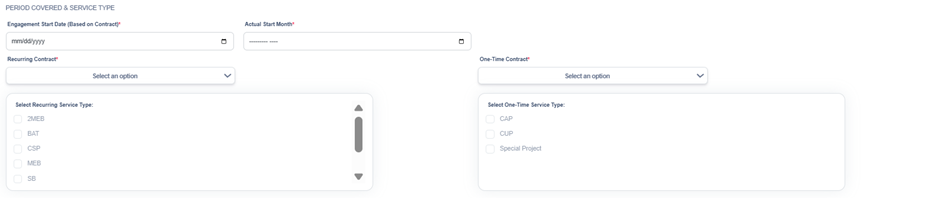
5. Period Covered & Service Type
- Engagement Start Date (Based on Contract)* — Select the contract start date (mm/dd/yyyy).
- Actual Start Month* — Select the actual month the engagement began (date picker).
- Recurring Contract* — Select Yes/No. If recurring, choose one or more Recurring Service Type checkboxes (e.g., 2MEB, BAT, CSP, MEB, SB).
- One-Time Contract* — Select Yes/No. If this is a one-time engagement, select the appropriate option and pick one or more One-Time Service Type checkboxes (e.g., CAP, CUP, Special Project).
6. Revenue Type & Financials
- Hourly Contract? — Check this box if the contract is hourly; then enter Hourly Rate.
- Enter applicable revenue values (leave blank if not applicable):
- Monthly Recurring Revenue (MRR)
- Quarterly Recurring Revenue (QRR)
- Semi-Annual Recurring Revenue (SARR)
- Annual Recurring Revenue (ARR)
- Project One-Time Revenue
- Security Deposit
- On-Boarding Fee

7. Upload Supporting Documents
- In the Upload Supporting Documents area, click Choose files or drag-and-drop contract files into the dashed box.
- Attach all relevant files (master contract, signed agreement, annexes).
- Wait for files to finish uploading — the form typically shows the filename and upload status.

8. Review and Save
- Review all entries for accuracy (dates, agreement number, signatory info, revenue amounts, and attached files).
- Click the Save button (bottom right) to submit the contract record.
- The system will validate required fields; if there are missing or invalid entries, inline messages will prompt you to correct them.
- After successful save, the new contract will appear in the Contracts Main View.