The Client Main View is the main area for managing client records in the CMD module. It shows a list of active and disengaged clients and allows users to search, add, view, update, or disable records, making it easier to keep client information accurate and up to date.
Client Main View
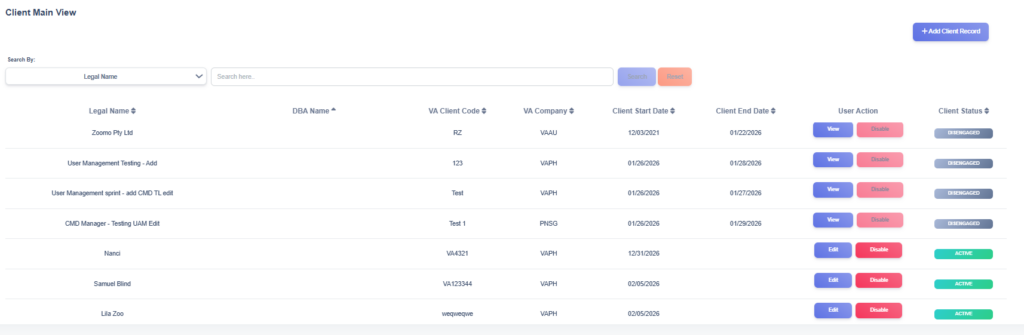
The Client Main View provides users with an organized view of client records stored in the CMD. Each record displays important details such as the client’s legal name, DBA (Doing Business As) name, VA client code, VA company, client start date, client end date, and current status. This module serves as the central point for managing client information and ensuring data remains accurate and accessible.
At the top of this section is a search function, which allows users to filter records by criteria such as Legal Name, DBA (Doing Business As) name, VA Client Code and VA Company. This makes it easy to locate a specific client or group of clients quickly, without scrolling through the full list.
On the right-hand side, the Add Client Record button enables users to create a new client record and include all relevant details.
For each record in the list, users are given three key action buttons:
- The View button allows users to view existing client information.
- The Edit button allows modifications to existing client information, such as updating details or correcting errors.
- The Disable button is used to mark a client as disengaged, which removes them from the active list but keeps the record in the system for tracking and reporting purposes.
New Client Record
1. Open the Add Client Record form
- From the Client Main View, click + Add Client Record (top right).
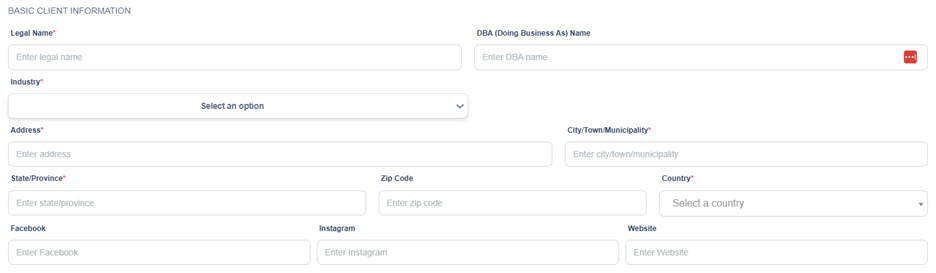
2. Complete Basic Client Information
Fill in the fields under Basic Client Information:
- Legal Name* — Enter the client’s official/legal business name.
- DBA (Doing Business As) Name — Optional trade name.
- Industry* — Select the client’s industry from the dropdown.
- Address* — Enter Street address.
- City / Town / Municipality* — Enter the city or municipality.
- State / Province — Optional.
- Zip Code — Optional.
- Country* — Select the client’s country from the dropdown.
- Facebook / Instagram / Website — Optional social/website links.
3. Provide VA Specific Client Information
Fill the VA Specific Client Information section:
- Lead Source* — Choose how the lead originated (dropdown).
- Referred By — Optional name or reference.
- Client Start Date* — Use the date picker (format shown mm/dd/yyyy).
- VA Client Code* — Enter the internal client code used by VA.
- VA Company* — Select the VA company from the dropdown.
- Select Level 1 Client Profile* — Refer to instructions below.
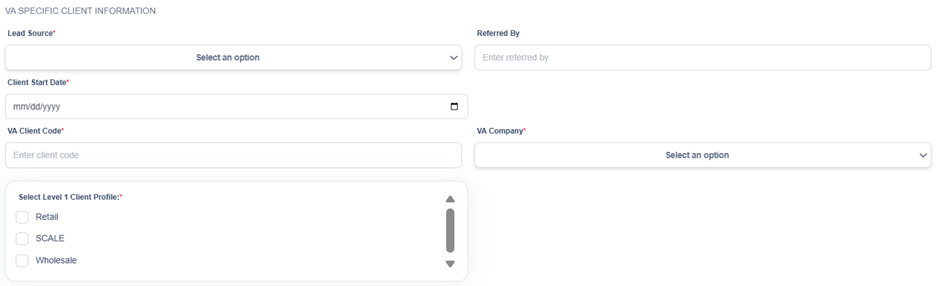
4. The Level 1 Client Profile
The Level 1 Client profile allows for further categorization of the type of client. Choose the type of profile based on the options below.
5. Attach Mother Contracts
- Use the Upload Mother Contracts area: either click Choose files or drag and drop files into the dashed box.
- Attach any master contract documents or supporting files for this client. (The system will validate uploaded files to ensure they are in PDF format.)

- Enter document type in the Type of Document field

6. Save the new client record
- Click the Save button (bottom right) to submit the form.
- The system will validate required fields; if any required field is missing or invalid, you will see an inline message prompting you to correct it.
- After a successful save, the new client record will appear in the Client Main View list.