The Employee Employment Record Main View (EE-R) module serves as a centralized repository for maintaining detailed information about each employee’s employment history within Vertaccount. It captures essential data such as the employee’s start and end dates, job title or position, company employment (e.g., VAPH, VAUS), and employment status—whether Employed, Independent Contractor, or Elected.
Employee Employment Record Main View
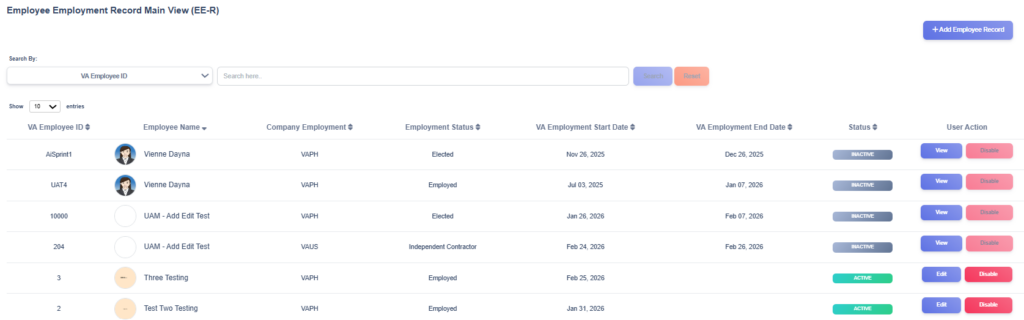
The Employee Employment Record Main View provides users with an organized list of all employment records stored in the EMD. Each record displays important details such as the individual’s employee ID, name, company, employment start and end date and available user actions. This page serves as the central point for managing employment records.
Record Status
Each record includes a Status column that indicates the current state of the personal record:
- Active – The employee is still engaged in active service.
- Inactive – The record is inactive but retained for audit and historical tracking.
User Actions
For each record in the list, users are given several action buttons for managing employment data:
- Edit – Allows modifications to existing employment record such as updating employment details or correcting entries.
- Disable – Deactivates an employment record, marking it as disabled while keeping it visible in the list for tracking and reporting purposes.
- View – Displays a disabled (inactive) record in read-only mode, ensuring historical employment information remains accessible for audit or reference purposes.
New Employment Record
1) Open the EE-R form
- From the Employee Employment Record Main View, click + Add Employee Record (top right).
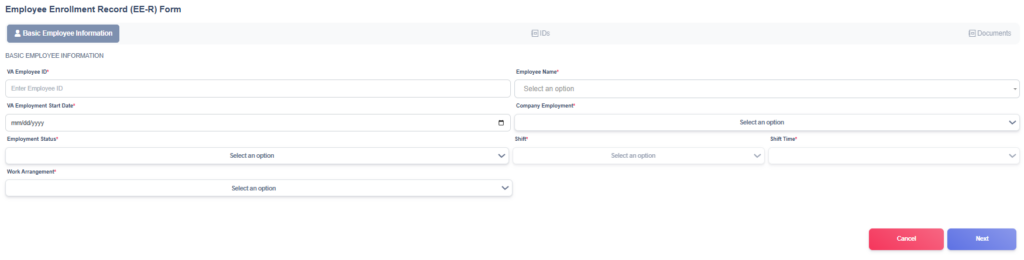
2) Tab 1 — Basic Employee Information
Complete all required fields (and optional fields as needed).
- VA Employee ID* — Enter the unique employee ID used by VA (e.g., VA001, VA010 etc.).
- Employee Name* — Select the employee from the list of VA‑P records dropdown.
- VA Employment Start Date* (date picker) — Choose the date this employment engagement begins. This start date is used to compute the employee’s VA Work Experience.
- Company Employment* — Choose which VA company the employee is assigned to for this record (e.g., VAPH, VAUS).
- Employment Status*— Select the employment type for this engagement. Typical options and short meanings:
- Employed — Employee is a regular/salaried worker and engagement is employer‑employee.
- Elected — Employee holds an elected position (President, CEO etc.).
- Independent Contractor — Worker engaged on contractor terms (not payroll employee).
- Shift*— Select the shift to which the employee is assigned.
- Shift Time*— Select the specific shift time to which the employee is assigned.
- Work Arrangement*— Select the work arrangement assigned to the employee (e.g., work office, work from home, or hybrid).
- When all required fields are filled, click Next (bottom right) to go to the IDs tab.
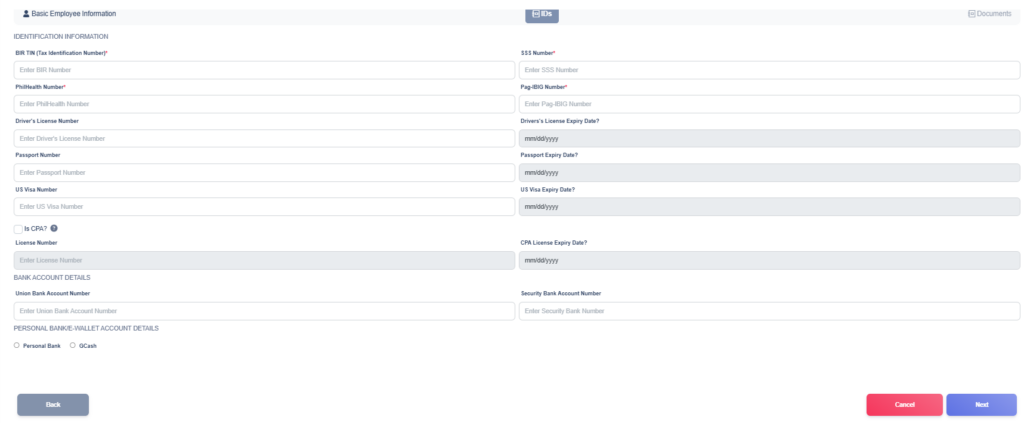
3. Tab 2 — IDs tab (Identification Information)
The fields required in the ID tab vary based on the Company Employment and Employment Status chosen in the Basic Employment tab.
For VAPH-Employed:
- Fill in the following required fields:
- BIR TIN (Tax Identification Number)* – Enter the employee’s BIR TIN.
- SSS Number* – Input the employee’s Social Security System (SSS) number.
- PhilHealth Number* – Enter the employee’s PhilHealth number.
- Pag-IBIG Number* – Provide the employee’s Pag-IBIG membership number.
- Enter any optional identification details if applicable:
- Driver’s License Number – Input the employee’s driver’s license number, if available.
- Driver’s License Expiry Date – Select the corresponding expiration date.
- Passport Number – Provide the employee’s passport number, if available.
- Passport Expiry Date – Enter the expiration date of the passport.
- US Visa Number – Enter the US visa number, if applicable.
- US Visa Expiry Date – Input the visa expiration date.
- Is CPA? – Check the tick box if the employee is a Certified Public Accountant.
- CPA License Number – Input the employee’s CPA license number.
- CPA License Expiry Date – Select the corresponding expiration date.
- Union Bank Account Number – Input the employee’s account number once available.
- Security Bank Account Number – Input the employee’s account number once available.
- For Personal Bank / E-Wallet Account Details, select either Personal Bank or GCash using the radio buttons.
- Personal Bank
- Bank Name – Select from the dropdown the corresponding bank.
- Account Number – Input the employee’s personal account number.
- Account Name – Input the employee’s personal account name.
- GCash
- GCash Number – Input the employee’s Gcash number.
- GCash Name – Input the employee’s Gcash name.
- Personal Bank
- Review all entered data to ensure accuracy and completeness.
- Click Next to proceed to the Documents tab or Back to return to the previous section.
For VAUS-Employed:
- Fill in the following required fields:
- Social Security Number* – Input the employee’s Social Security System (SSS) number.
- Review all entered data to ensure accuracy and completeness.
- Click Next to proceed to the Documents tab or Back to return to the previous section.

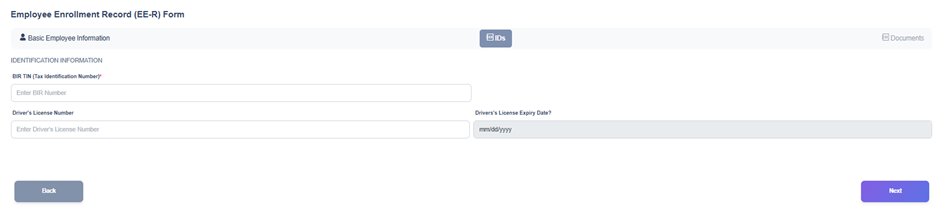
For VAPH-Independent Contractor:
- Fill in the following required fields:
- BIR TIN (Tax Identification Number)* – Enter the employee’s BIR TIN.
- Enter optional identification details if applicable:
- Driver’s License Number – Input the employee’s driver’s license number, if available.
- Driver’s License Expiry Date – Select the corresponding expiration date.
- Review all entered data to ensure accuracy and completeness.
- Click Next to proceed to the Documents tab or Back to return to the previous section.
For VAUS-Independent Contractor:
- Fill in the following required fields:
- Social Security Number or Federal Employer Identification Number* – Input the employee’s Social Security System (SSS) or Federal Employer Identification number.
- Review all entered data to ensure accuracy and completeness.
- Click Next to proceed to the Documents tab or Back to return to the previous section.

4) Tab 3 — Documents tab
- Under Upload Document/s, either drag files into the dotted box or click Choose files or drag them here to open a file picker.
- After selecting the file(s), the document list below will show each uploaded file with these columns:
- Type Of Document — open the dropdown and choose the document type that best matches (Passport, Driver’s License, VISA, W‑9 Form, etc.). Select one per file.
- Filename — Displays the uploaded filename.
- Upload Time — Shows when the file was uploaded.
- Download — A green button to download the uploaded file.
- Discontinue Use? — Toggle on/off to mark the document discontinued (if the document is no longer valid or should not be used).
- Discontinue Reason — If you toggle discontinue, enter a short reason.
- Repeat for each document you need to upload.
- Click Save (bottom right) to create the new EE‑R.
5) After saving
- The system should confirm successful.
- The new employment record will appear in the EE‑R main view (table) where you can Edit or Disable the record.