The VA Personal Record Main View (VA-P) is the main area for managing personal records in the Employee Master Database (EMD) module. It displays a list of all individuals registered in the system, including both active and inactive records. This section allows users to search, add, view, update, disable, or reactivate records, making it easier to keep employee personal information accurate and up to date.
VA Personal Record Main View

The VA Personal Record Main View provides users with an organized list of all personal records stored in the EMD. Each record displays important details such as the individual’s name, status, and available user actions. This page serves as the central point for managing personal information before linking it to employment records.
Record Status
Each record includes a Status column that indicates the current state of the personal record:
- Active-Incomplete – The person’s record is active but not yet linked to an employment record and a cohort assignment.
- Active – The person’s record is linked to an employment record and a cohort assignment.
- Inactive – The record is inactive but retained for audit and historical tracking.
User Actions
For each record in the list, users are given several action buttons for managing personal data:
- Edit – Allows modifications to existing personal information such as updating contact details or correcting entries.
- Disable – Deactivates a personal record, marking it as inactive while keeping it visible in the list for tracking and reporting purposes.
- Reactivate – Re-enables a previously deactivated record, restoring it to active status and allowing further updates.
- View – Displays a disabled (inactive) record in read-only mode, ensuring historical personal information remains accessible for audit or reference purposes.
New Personal Record
1) Open the VA-P form
- From the VA Personal Record Main View, click + Add Client Record (top right).
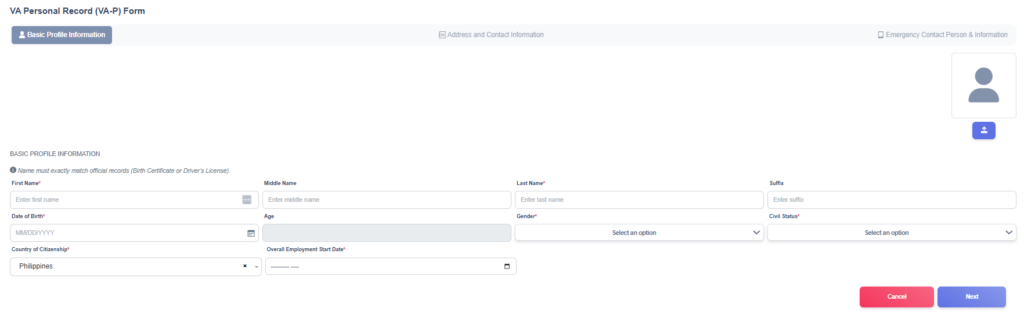
2) Tab 1 — Basic Profile Information
Complete all required fields (and optional fields as needed).
- Profile photo — Click the upload icon / avatar area at the top-right to upload a headshot. Accepted formats are JPG/PNG.
- First Name* — Enter first name.
- Middle Name — Enter middle name (optional).
- Last Name* — Enter last name.
- Suffix — Enter suffix (Jr., Sr., III) if applicable.
- Date of Birth* — Use the date picker or type MM/DD/YYYY.
- The form auto-calculates Age (read-only) from DOB.
- Gender* — Choose from dropdown.
- Civil Status* — Select marital status from dropdown (e.g., Single, Married).
- Country of Citizenship* — Select from the dropdown.
- Date Started Working* — Use date picker to record the hire/start date.
- When finished on this tab click Next (bottom-right).
3. Tab 2 — Address and Contact Information
Fill permanent and present addresses, contact number and personal email.
- Permanent Address* — Enter full permanent address (street, building, barangay, etc.).
- Brgy/Sitio* — Enter brgy/sitio.
- City/Town/Municipality* — Enter city/municipality.
- State/Province* — Enter province.
- Zip Code — Enter postal code (if available).
- Country* — Select country (e.g., Philippines).
- Current/Present Address Same with Permanent Address?
- If the present address is the same, tick the checkbox. The form should copy permanent address to present address fields automatically.
- Current/Present Address* — If not the same, enter present address.
- Brgy/Sitio* — Enter brgy/sitio.
- City/Town/Municipality* — Enter present city/municipality.
- State/Province* — Enter present state/province.
- Zip Code — Enter present postal code.
- Country* — Select present address country.
- Contact Number* — Enter primary phone/mobile.
- Personal Email* — Enter a valid email address.
- Click Next to continue (or Back to return to Basic Profile).
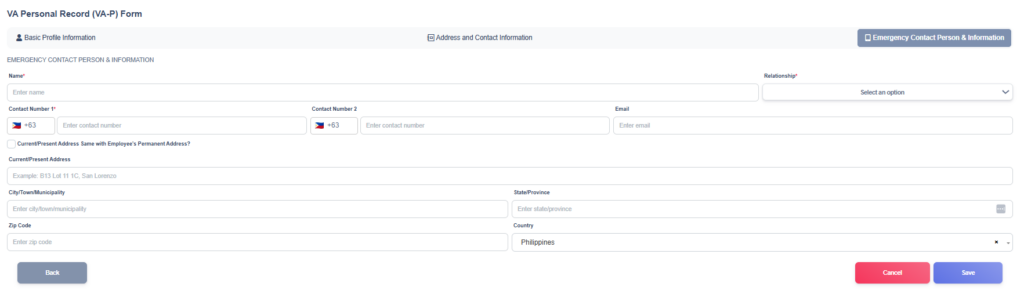
4) Tab 3 — Emergency Contact Person & Information
Enter emergency contact details — at least one contact required.
- Name* — Full name of emergency contact.
- Relationship* — Select relationship from dropdown (e.g., Spouse, Parent, Sibling, Friend).
- Contact Number* — Phone number of emergency contact.
- Email* — Emergency contact email (if available).
- Current/Present Address — Address of emergency contact (optional but recommended).
- City/Town/Municipality — City of emergency contact.
- State/Province — State/province of emergency contact.
- Zip Code — Postal code.
- Country — Select country (defaults to Philippines in screenshots).
- Click Save (bottom-right) to submit the new VA Personal Record. If you need to change earlier information, click Back.
5) After saving
- The system should confirm successful.
- Newly added record should appear in the VA Personal Record Main View — use search or filters to find it.